
Braided Leather Dog Leash DIY
Learn how to handmake your own stylish braided leather dog leash. Tired of your boring old dog leash? Wish you had something a little more unique for your dog, whom you love so much? We've got you covered! Throughout this braided leather dog leash DIY blog, we will walk you through the process step by step and end with the leather braiding video tutorial. To use correct leather terminology, this is referred to as a bleed knot since one leather strap bleeds through the next strap.

Close up of finished Braided Leather Dog Collar
What You'll Need:
- 1 strip of dyed leather
- 1 utility knife
- 1 swivel snap dog leash clip
Optional:
- 1 round leather hole punch tool
- 2 leather rivets
- 1 metal anvil
Step 1: Preparing the Leather
To start out your braided leather dog leash, you will need to have two slots cut out on each end. (The slots on the leash clip end will need to be closer together than the slots on the leash handle end.) For this braided dog leash, we used 9 oz thick leather (9/64 inch thick) and cut all the slots 2 1/2 inches long with a utility knife. The slots can be shorter or longer depending on how tight or loose you want the braid to be.
On the dog leash clip end, we made the slots 1 1/2 inches apart. On the handle end, we made the slots 18 inches apart. You may want to make to change this distance apart to make the handle on your leash smaller or bigger than we did depending on your preferences.

Slots for Braided Leather Dog Collar
Step 2: Braiding the Clip End of the Leash
To begin the braid, we're going to start on the clip end of the leash, which will be the end where the two slots are close together. You're going to take the end of the dog leash and put it through the grain side (also known as the finished side of the leather) of the first slot and pull it snug.

End of Leather Dog Leash Going Through Grain Side of Leather

First Twist in Handmade Leather Dog Leash
Next you're going to repeat this step, this time jumping to the second slot and again putting the end of the dog leash through the grain (finished) side of the leather and pulling it snug.

Second Twist in Braided Leather Dog Lead
Step 3: Attaching the Leash Clip to the Braided Dog Lead
Now you're ready to attach the clip to the dog leash. To do this, you'll first need to slide the clip onto the leash, just until you reach the middle point between the two twists you already made in the previous steps.

Attaching Flat Solid Brass Swivel Snap to Handcrafted Dog Leash
Afterwards, to secure the clip in place, you're going to take the end of the dog leash and once again, put it through the second slot, this time coming up through the back (unfinished side) of the leather.

Securing Solid Brass Swivel Snap
Once you have that through, you can take the other end of your dog leash and pull it through the first slot.

Last Step of Clip End of Braided Dog Leash
After you've pulled the end of the leash through, it may take a little bit of adjusting of the braid to achieve the desired look. Once you've adjusted it into place, your clip end of your leash should look like this:

Finished Clip End of Braided Leather Dog Leash
Step 4: Braiding the Handle End of the Leather Leash
Now it's time to work on the Handle end of your handmade leather leash. Although the slots on this end are further apart, the process is the same. To start off you'll need to once again put the end of the leash through the grain (finished) side of the first slot and pull it snug.
Next, take the end of the leash and put it through the grain (finished) side of the second slot. Once you've pulled it snug it should look like this:

First two Twists for Handle End of Handmade Dog Leash
Step 5: Forming the Dog Leash Handle
Afterwards, you are now ready to form the handle! To do this, take the end of the leash and put it up through the back side (unfinished side) of the second slot. You will only need to pull it through enough so that the braided part is now on the finished side.

Forming the Handle End of Leather Dog Leash
After you have it through, you can take your clip end and pull it through the back side (unfinished side) of the first slot, pull it snug and then adjust it to your liking.

Securing Handle in Place for Dog Leash
Step 6: Securing the Leather Leash End
To fasten your leather tab down at the end of the leash on the handle side and leash clip side, you can either sew down the ends or, what we like to do is use a medium double capped rivet as seen here:

Setting Solid Brass Rivets on the Clip End of Handcrafted Dog Leash
To set the rivets, you will need to use a leather hole punch tool to make a 1/8 inch round hole through both layers of leather, ensuring that the holes line up. This leather craft tool is used for many leatherworking projects. Next put the post of the rivet up through the back side of the leash and then attach the cap to the post. Then take your rivet setter and place it on top of the cap and hammer. We set the rivet on a flat solid metal anvil so there isn't any bounce. Repeat this on both the clip end and the handle end, and now you have your very own fancy braided leather dog leash!
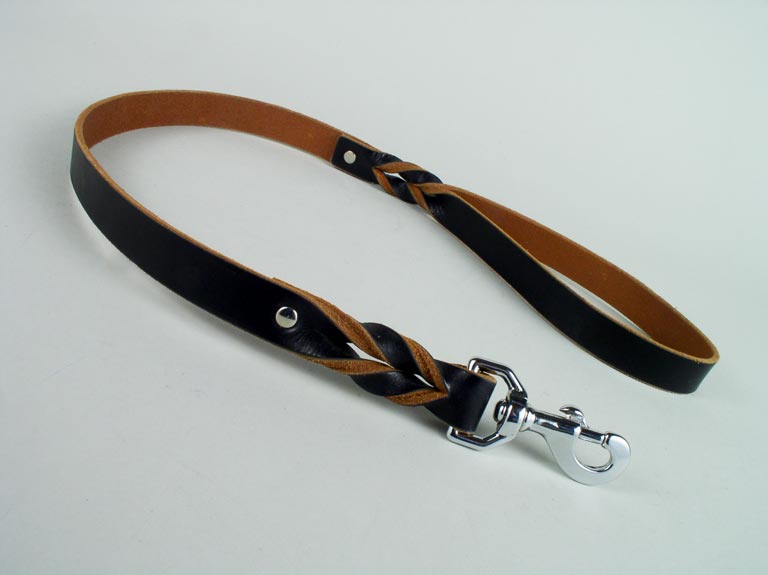
Finished Black, Braided Leather Dog Leash with Chrome Plated Solid Brass Swivel Snap
Learn how to make the braided leather dog leash in this leathercraft tutorial video.


