Leatherworking Tools Intro
What are the essential leatherworking tools you need? Getting into leathercrafting can be daunting because there are so many leatherworking tools and supplies available, all of which cost money. This post is aimed at helping you figure out what you really need to get started. I’ll cover the basic categories of tools and how to use them, and I’ll also talk about work-arounds for tools you might not want to commit to buying right away.
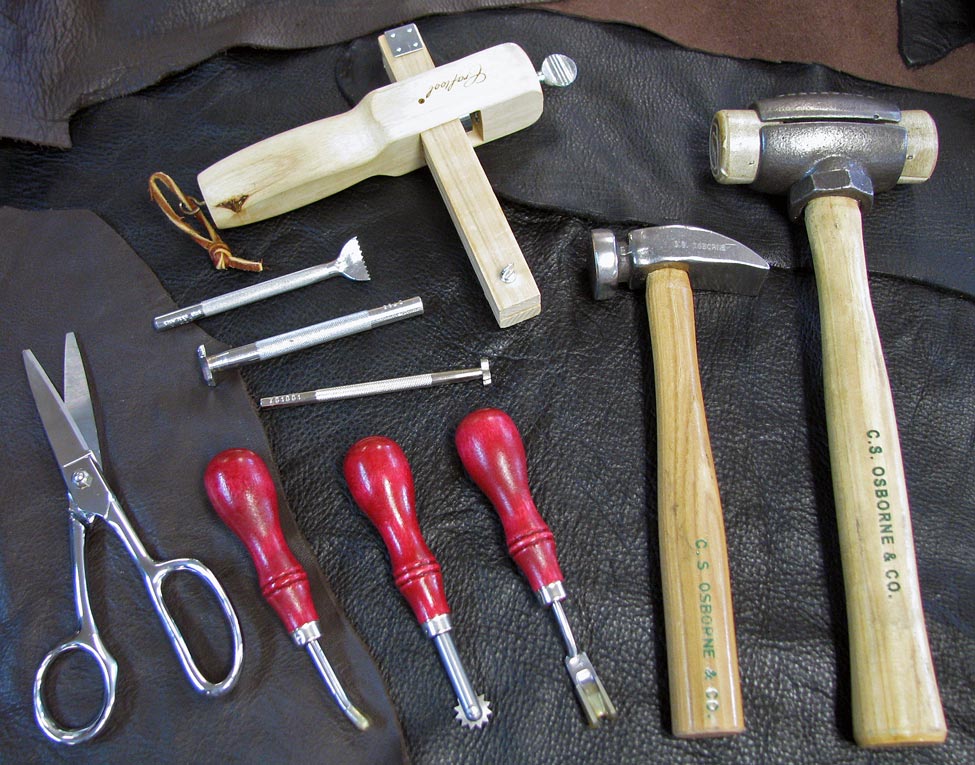
An assortment of leatherworking tools
My general recommendation for getting started is to have specific project in mind. It’s easier to figure out what leathercraft tools you need for one project than it is to figure out what you might need in the possible future. Once you have your list, ask yourself how else these tools will be useful to you. If your starting project is a belt, for example, you may think you need an oblong hole punch to make the buckle slot. This is a good idea if you know you’ll be making many belts, but if you’re more interested in trying your hands at a wide variety of small crafts, specialized tools can likely wait if your budget is tight.
Leather
I won’t get into a detailed explanation here on the different types and qualities of leather – you can find more information at Leather Hides. I just want to quickly mention that there may be leather stores near you which sell scrap leather at a discount. Especially when you’re first learning, you’ll go through many test pieces. We currently sell our scrap leather to local customers for much less than our cut hide prices.
Cutting Leather
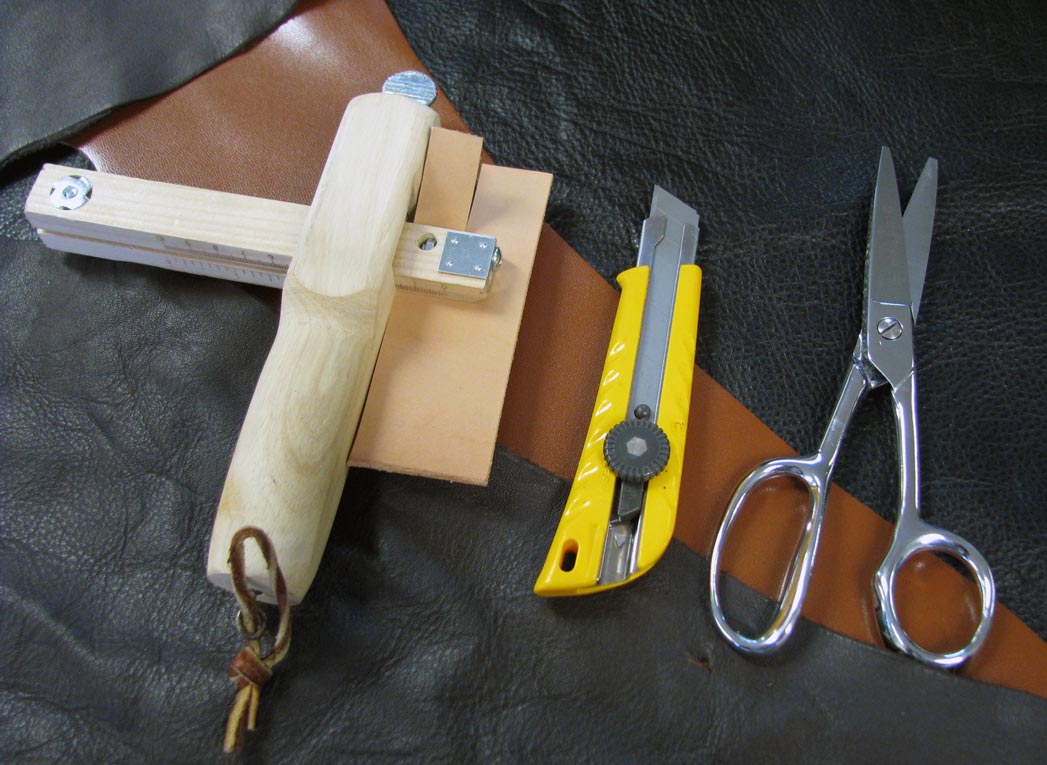
Leather cutting tools: strap cutter, utility knife, and leather shears.
Utility Knife - The number one thing you need in order to work with leather is a sharp utility knife, such as can be found at the hardware store. Make sure to change the blade frequently. A fresh blade will be much easier to cut with and the result will look cleaner.
To cut leather with a utility knife, first make sure the leather and your cutting pad are flat and unobstructed. Trace your pattern onto the leather in pencil. When cutting straight edges, I find it easiest to make two passes. I carefully line up my ruler, and drag my knife against it just firmly enough to score the leather. Then I remove the ruler and follow over my first cut, this time applying enough pressure to slice all the way through. Make sure to hold your blade perpendicular to the table when you cut.
Cutting on a curve will take some practice. For tight curves, I find it easiest to carve off pieces in a series of tiny cuts until the corner is smooth, rather than trying to make the full cut in one motion.
Shears - If you’ll be working with thin, supple leathers such as goatskin or garment leathers, you may want to invest in a quality pair of leather shears because the leather scissors are easier to use than a knife. However, the utility knife will work to start out with. Be warned that if you don’t have a fresh blade, it will pull soft leather as it cuts.
Strap Cutter – A leather strap cutter is a useful tool if you will regularly be making belts, dog collars, guitar straps, or anything that needs long strips of leather. For a tutorial on how to use this leather cutting tool, see our leather strap cutter tutorial video.
Punching Holes
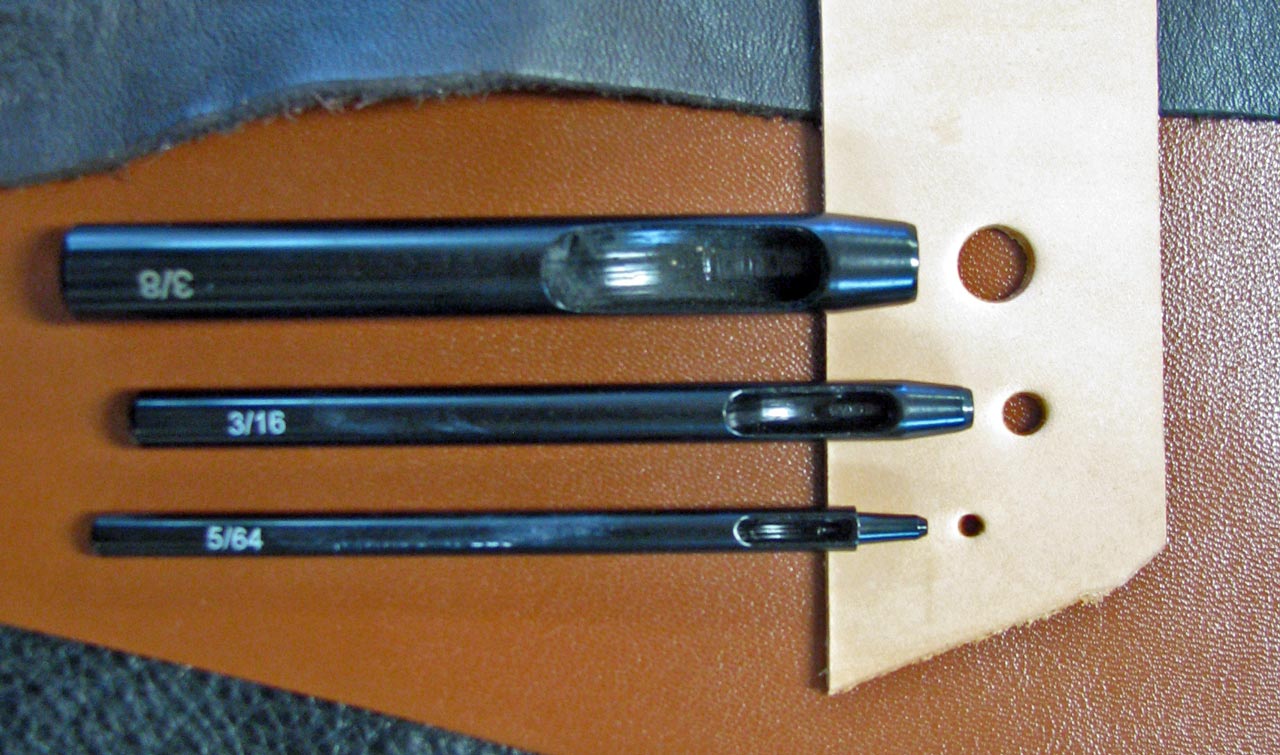
Three sizes of round drive punch.
Tools for punching holes in leather are another must if you’re going to make anything with rivets, jacket snaps, or buckle closures. I’ve covered the different types of punches and how to use them in more depth at Leather Hole Punch For Belts & Leatherwork. I recommend having several sizes of round drive punch, or else a multi punch kit with interchangeable heads.
As mentioned above, you don’t need an oblong punch right out the gate. Instead, you can make an oblong shaped cutout by making two round holes with a drive punch, and then connecting them using your utility knife.
Setting Snaps, Rivets, Grommets, and Eyelets
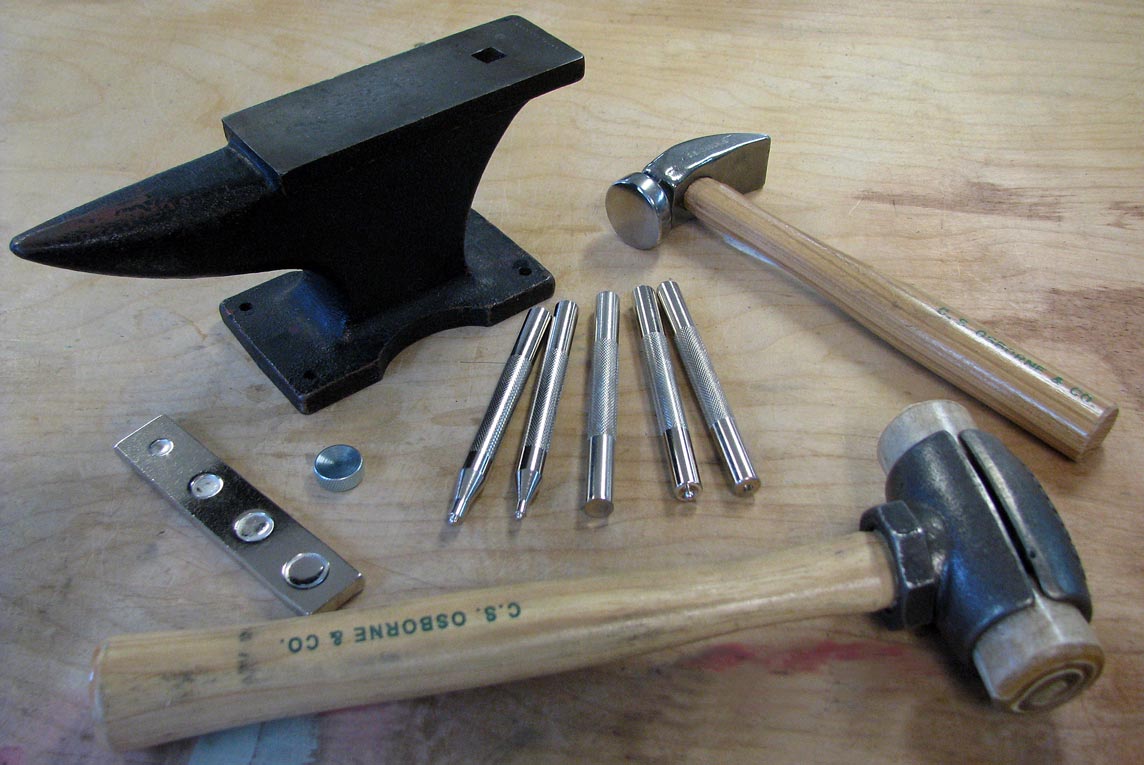
A mini anvil, deluxe snap rivet setter set, a leather working hammer, and a heavy rawhide mallet.
Setting Tools – Setting tools allow you to preserve the domed shape of rivets, snaps, grommets, eyelets etc. when you set them. If you don’t care about that, you can set rivets with a smooth leather working hammer. The rivet will be just as secure, but the top will be flattened. Each grommet setter, eyelet setter, snap setter and rivet setter are made to set a particular size.
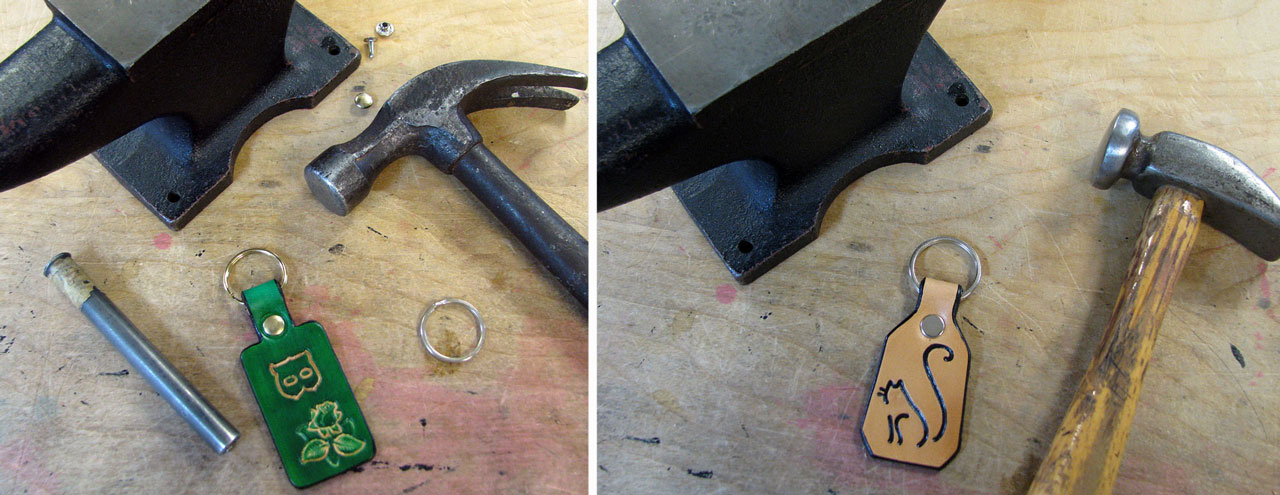
Left: rivet set with a setting tool and a carpenter's hammer. Right: rivet set with a leather working hammer.
Snaps, grommets, and eyelets do require setters. You can buy these individually or in sets.
Anvils – You will need a solid surface to set your snaps and rivets against. We have several of these miniature anvils in our shop. You may also be able to find materials to repurpose into an anvil. The big anvil in our shop is an old piece of railway track, which Jamie (owner of Leathersmith Designs) had permission to get from his industrial arts class many years ago when in school.
You can also get tiny snap and rivet setting anvils. These have a flat side and a concave side, for preserving the domed shape of snaps. They are best used atop a larger anvil, but can also be used on any hard surface that is sufficiently sturdy. If you’ll only be setting a few things, you can get away with having a dot and rivet anvil and not a larger one.
Mallets - To use hole punch tools and stamp tools you will need a hammer or mallet. An ordinary carpenter’s hammer will work fine to begin with, but it will damage your tools over time by mushrooming the top of your leatherworking tool. In our shop we use rawhide mallets to preserve our tools. Poly headed mallets are a good option as well.
Nylon and rawhide mallets come in different weights. I use our heaviest mallet for punching holes, and a medium-weight mallet for stamping designs.
Tooling Leather
Stamping Tools - There are a huge variety of leather stamps available, sold individually or in sets. At our shop we sell alphabet and number stamp sets, as well as small decorative and pictorial stamps.
When Jamie was just starting out in leather work in the 70s, he made his own stamp tools out of heavy duty nail heads. He used nail files and a grinder to shape them.
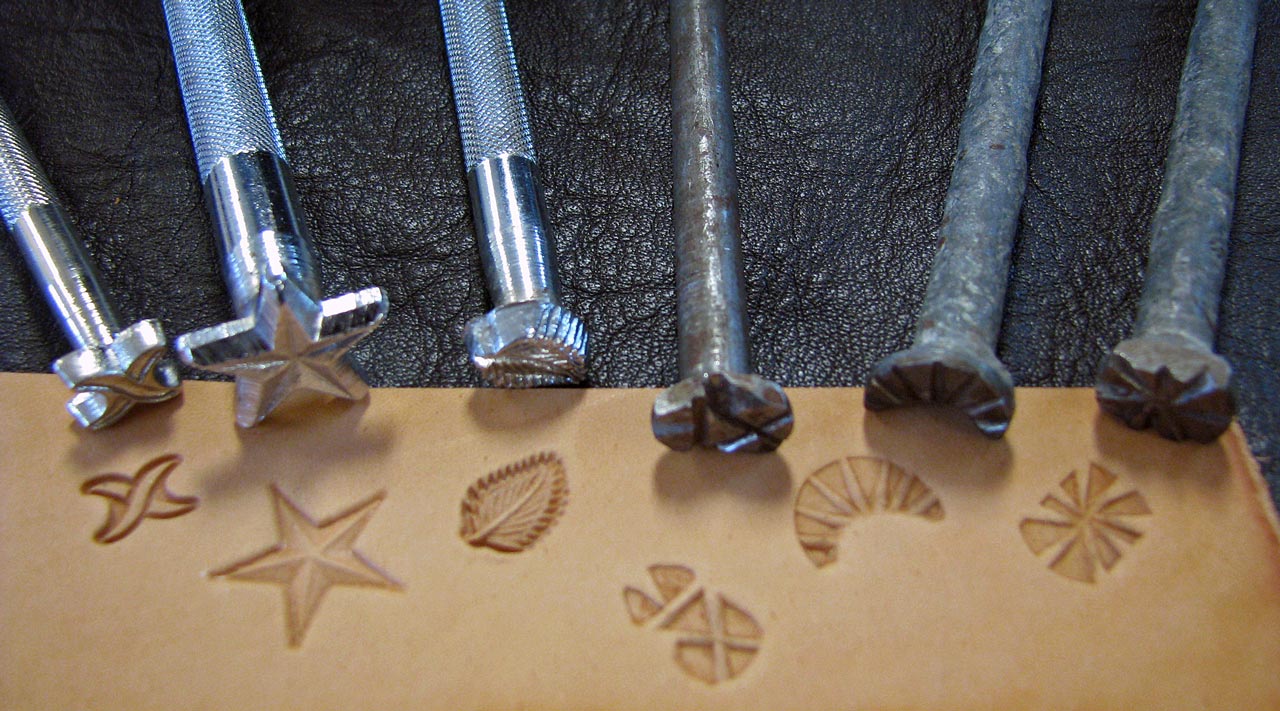
Left: three manufactured leather stamping tools. Right: three leather stamping tools made from nail heads.
Stamping leather evenly and accurately takes some practice. First, wet your leather by running a sponge over it. Then line up your stamp. Hold the handle of the stamp perpendicular to the leather, and bring the rawhide mallet straight down onto the center of it.
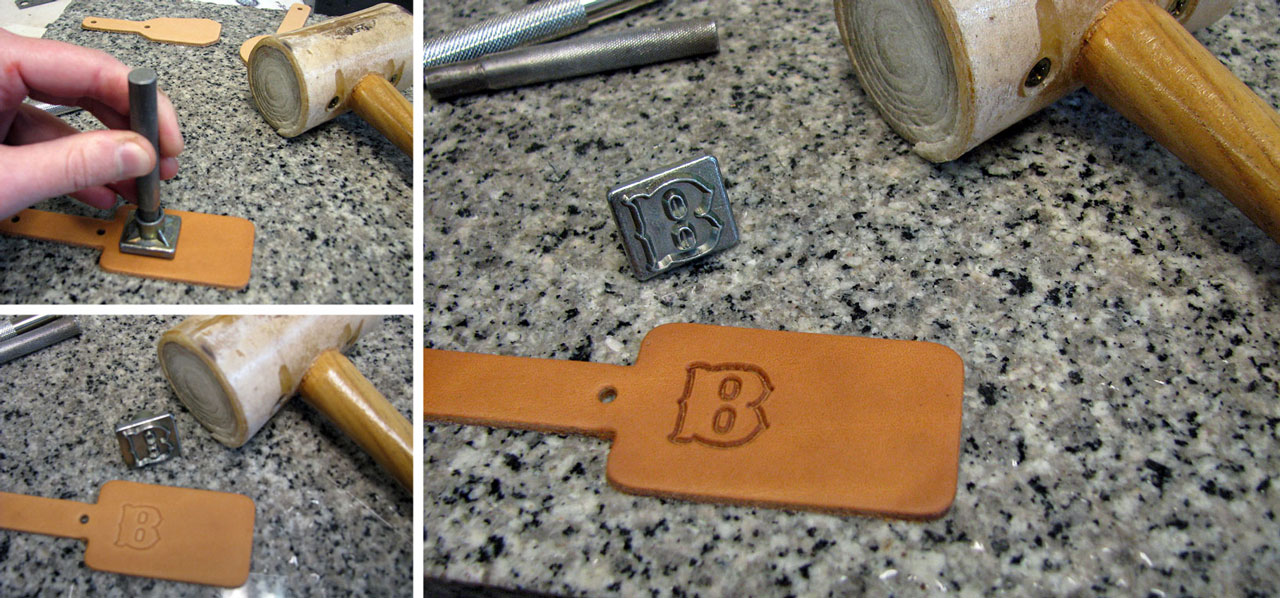
Test your stamp placement by making a light impression. Then replace the stamp and hammer more firmly to deepen the impression.
Use a straight edge to line up alphabet and number stamps – something thin enough that you can slide it under the lip of the stamp and rest the letter edges against it. We keep strips of poster board by our stamping station for this purpose.
Etching Tools - Etched designs have a hand drawn look, as opposed to the crisp, deep edges of stamped designs.
To etch leather you will need a ball point stylus and a copy of the image you want to transfer. Wet your leather with a sponge, and place the paper with the image on top of it. Trace over the lines firmly with a pencil, and remove the paper. Retrace the lines you’ve made with the etching tool, wetting the leather as needed.
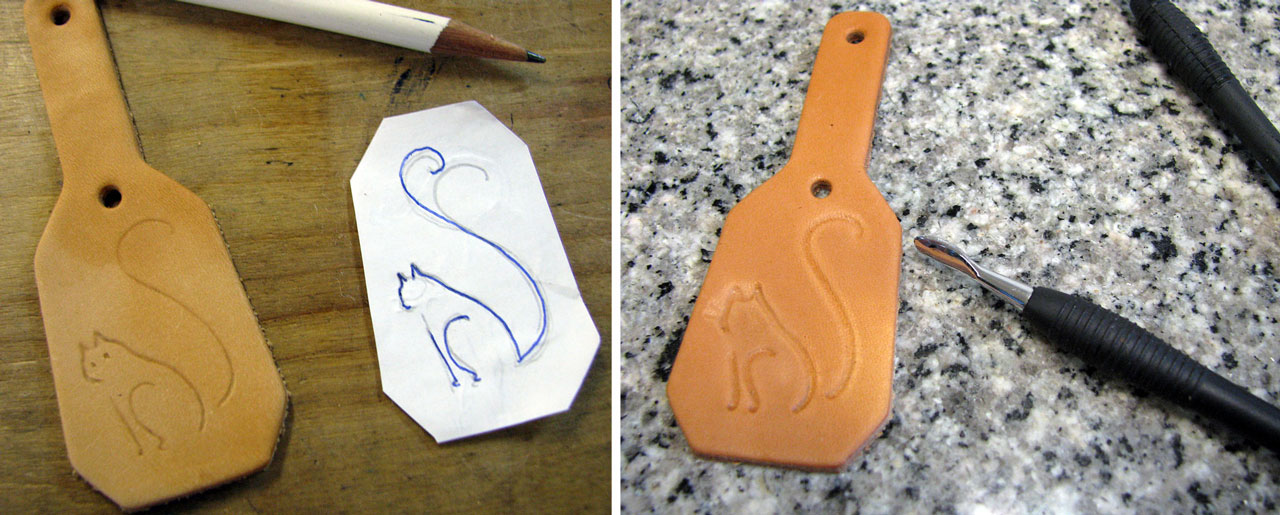
Left: initial image transfer using pencil. Right: the final etched design.
Finishing Edges
Beveller – This is one tool I would recommend to a beginner if you’re going to be working with thicker leather. A leather beveller or edger rounds out the edge of the leather, giving it a finished look and allowing straps to slide through buckles smoothly. On our dog collars we bevel the underside of the leather as well, so that there are no sharp edges to dig into the dog’s neck.
To use a beveller tool, set it against the near edge of your leather piece at a 45 degree angle from the table, as shown below. Push the beveller away from you along the edge of the leather, applying inward and downward force as you push.
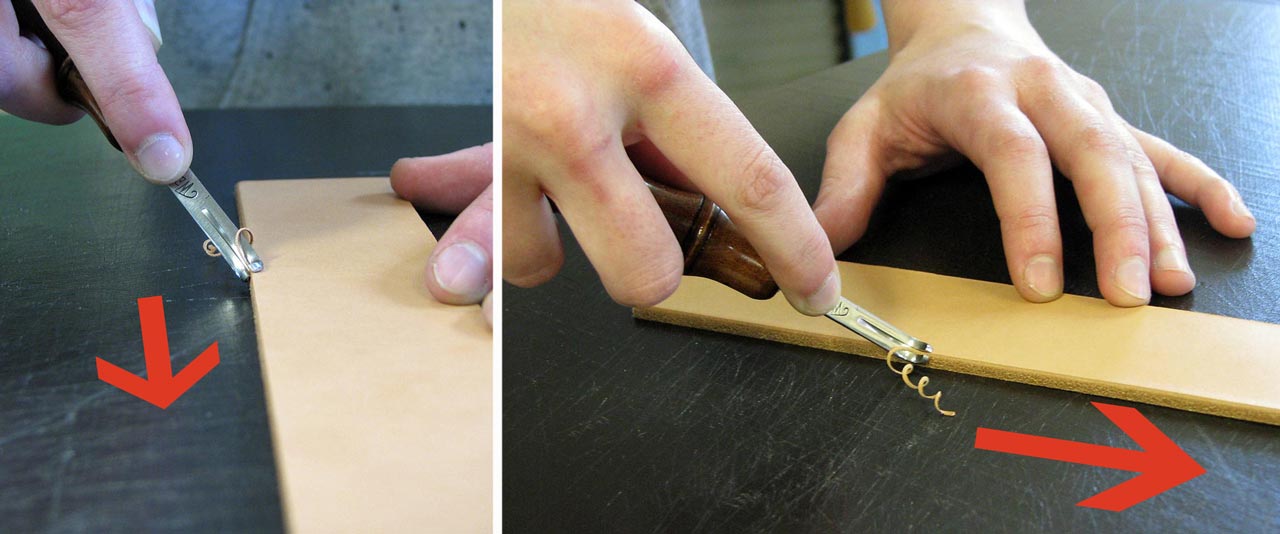
As you bevel, press down and inward towards the leather.
Bevellers come in different sizes, which indicate how much of the leather edge they will remove. The higher the number, the more pronounced the bevel. For most of our products we use a mid size beveller.
Skiver – A skiver leatherworking tool is used to thin an area on a piece of leather. Different styles of skiver serve different functions. Large skivers will thin out a whole strip of leather, or part of a strip. Small skivers are used for thinning down edges.
To thin edges with a skiver, lay your leather on a flat surface with the wrong side facing up. Set the flat blade of the skiver against the leather, facing the leather edge at an angle. Push the skiver down and outward, with a slight scooping motion. Repeat this all along the edge of the leather until it is even.
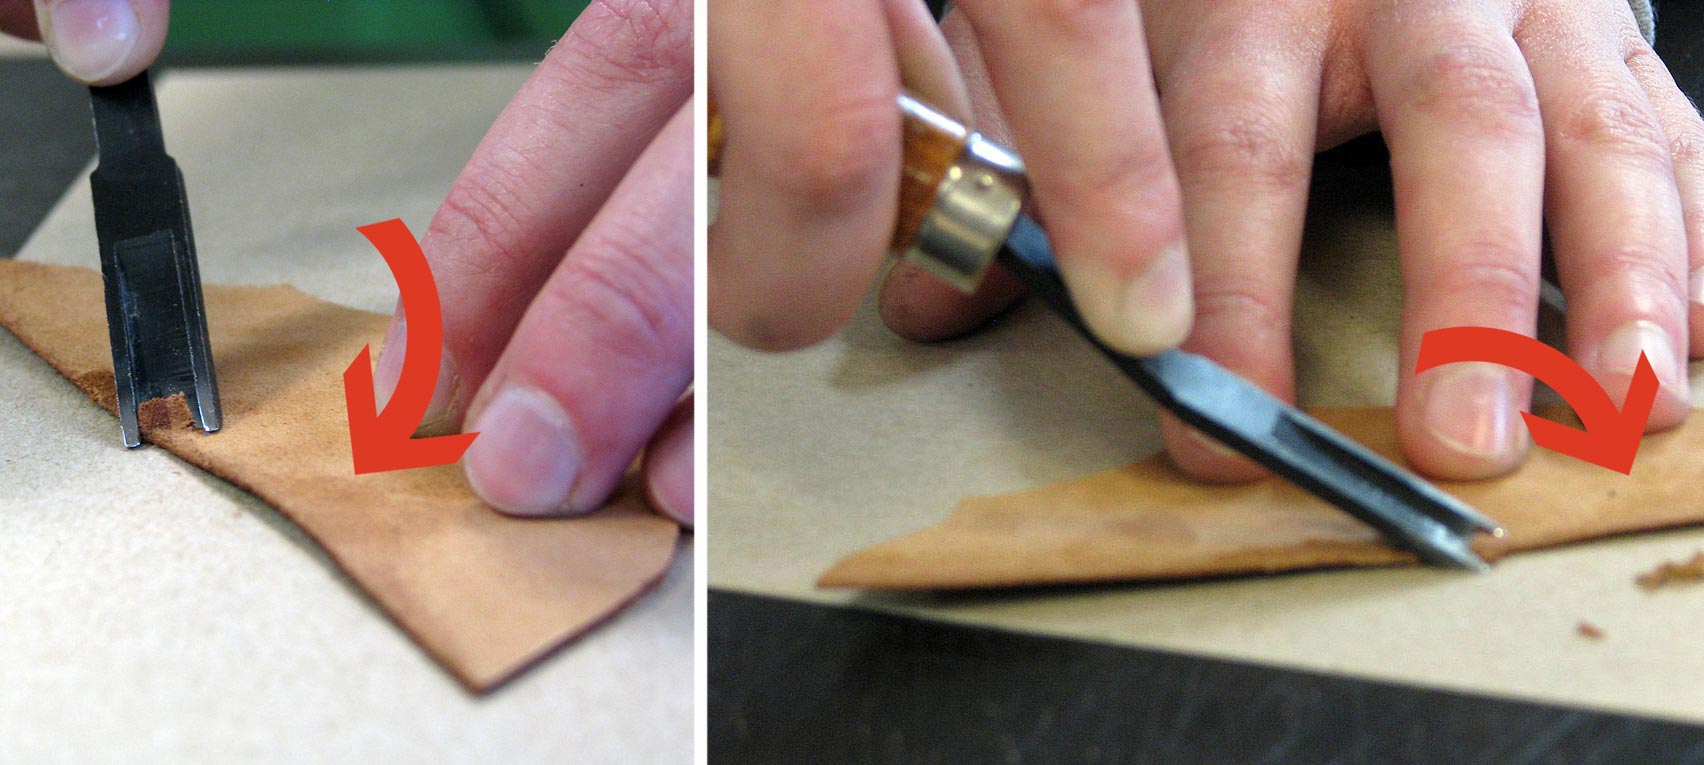
Use a scooping motion to skive leather edges thinner.
When using a skiver, I put a piece of poster board under the leather to protect our worktable from the blade.
Jamie discusses more detail in an article about finishing leather edges, and also goes into the story of how he learned the techniques we use.
Sewing Leather
Groover – Leather groovers cut a groove along the edge of your leather piece. This groove can be decorative, or it can be used to inset hand stitching. The space between the edge of the leather and the groove can be adjusted.
To use a groover tool, set it at the far end of your leather piece and pull towards you. As you pull, apply inward and downward force on the groover leather tool to hold it firmly against the leather. You may need to make several passes for really deep grooves.
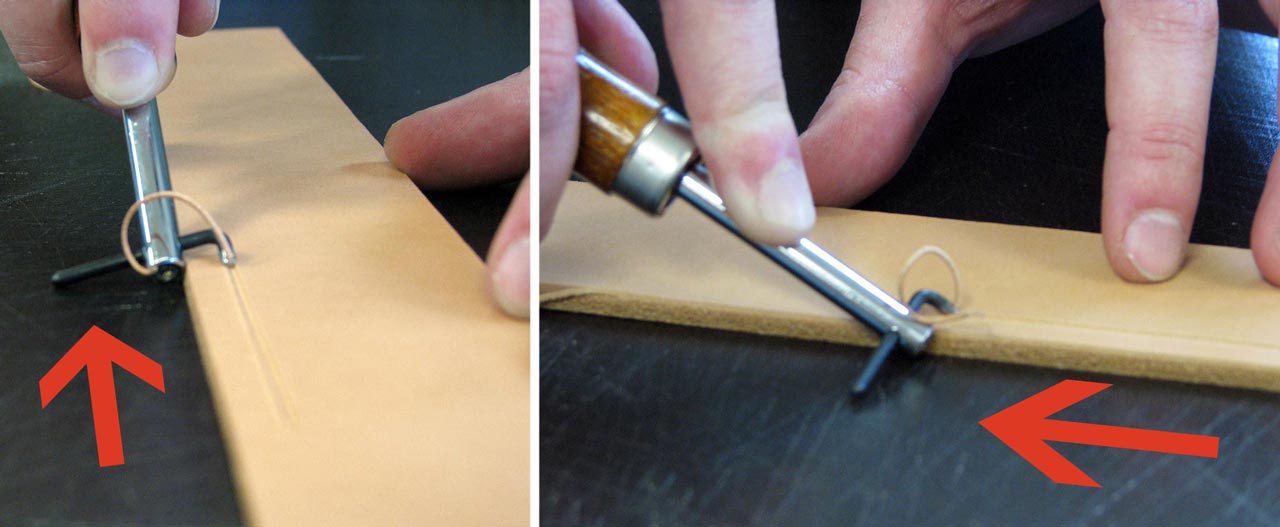
Press down and inward towards the leather as you drag the groover leather tool back.
Spacer – If you’ll be doing a lot of hand sewing, you can get a spacer leather tool to mark where your stitch holes will go. Run the wheel along a straight edge, or along a groove made by a groover. It will create evenly spaced pin pricks, which you can then open up using an awl or chisel. The size of the spacer wheel tells you how many stitches per inch it marks. A size 6 spacer will make 6 stitches per inch.
One workaround to get even stitches without a spacer, and without measuring each stitch with a ruler, is to use a fork. Press the tines into your leather along a straight edge. Then use an awl or chisel to puncture through the marks.
Awl – When sewing fabric, you create stitch holes with your needle as you sew. When sewing leather, the stitch holes need to be punched out beforehand. The simplest way to do this is with a sewing awl, which has a thin diamond shaped blade. First, mark where your stitch holes are going to be using a pencil, scratch awl, spacer, or fork. Then set your leather on a cork block or other soft material that the awl can stab into.
When stabbing through, hold the awl perpendicular to the leather. The long end of the diagonal blade should be at a 45 degree angle from the stitch line, as shown. Setting the blade parallel to the stitch line will weaken the leather along that line – similar to a perforated sheet of paper.
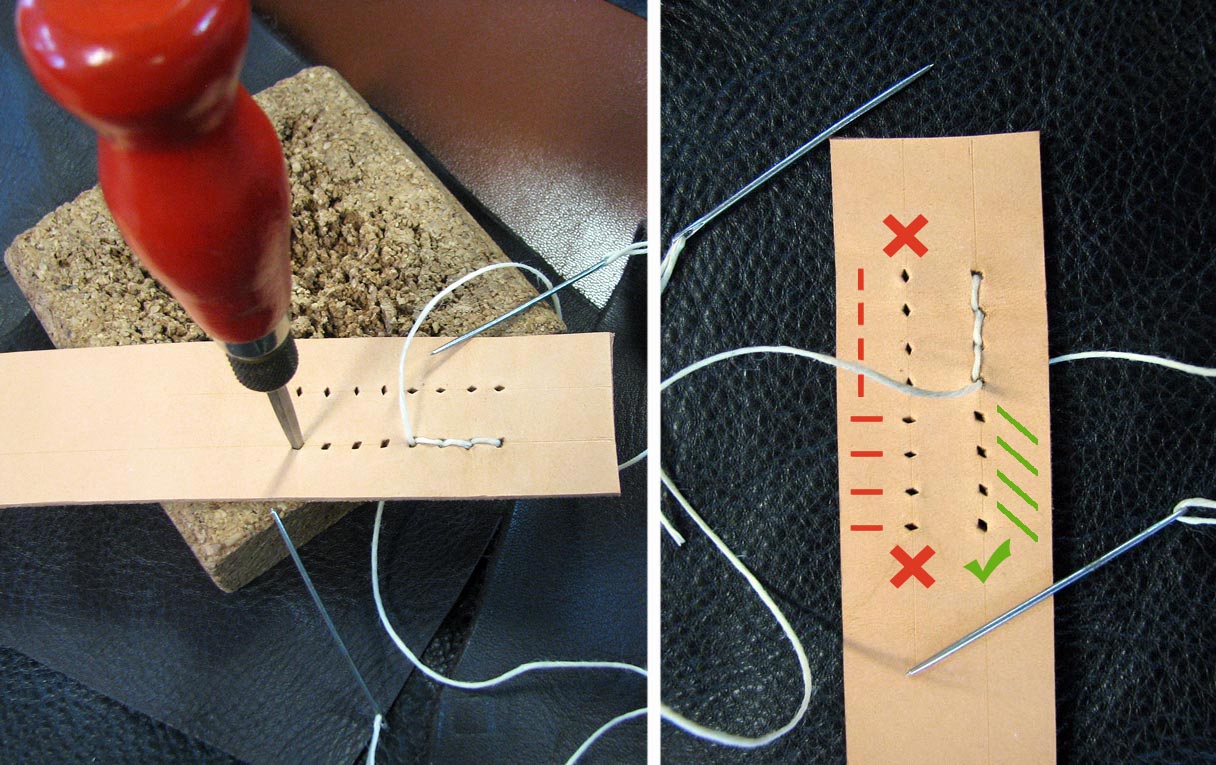
Stab your stitch holes at a diagonal to the stitch line with your sewing awl.
Needles – To sew leather you will need heavy needles with a large eye and a rounded tip. (Rounded, rather than pointed, because you aren’t using the needle itself to punch through your leather.) We use size 0 or size 00 harness needles.
When hand sewing leather, I use two needles, one at each end of the thread, as shown.
Lacing Leather
When lacing leather, we punch holes for the laces using a small drive punch. For a tutorial on how to create a braided lace design, read this article on How To Braid Leather With Three Laces.
Lacing Needles – Leather lacing needles have two sharp prongs instead of a loop hole at the head. Pry the head of the needle apart - I use another needle to hold it open - and place the end of your lace in the slot. Squeeze the needle back together so that the prongs puncture the lace and hold it in place. I use a skiver to thin the end of my lace before doing this, so that it sits flush with the needle.
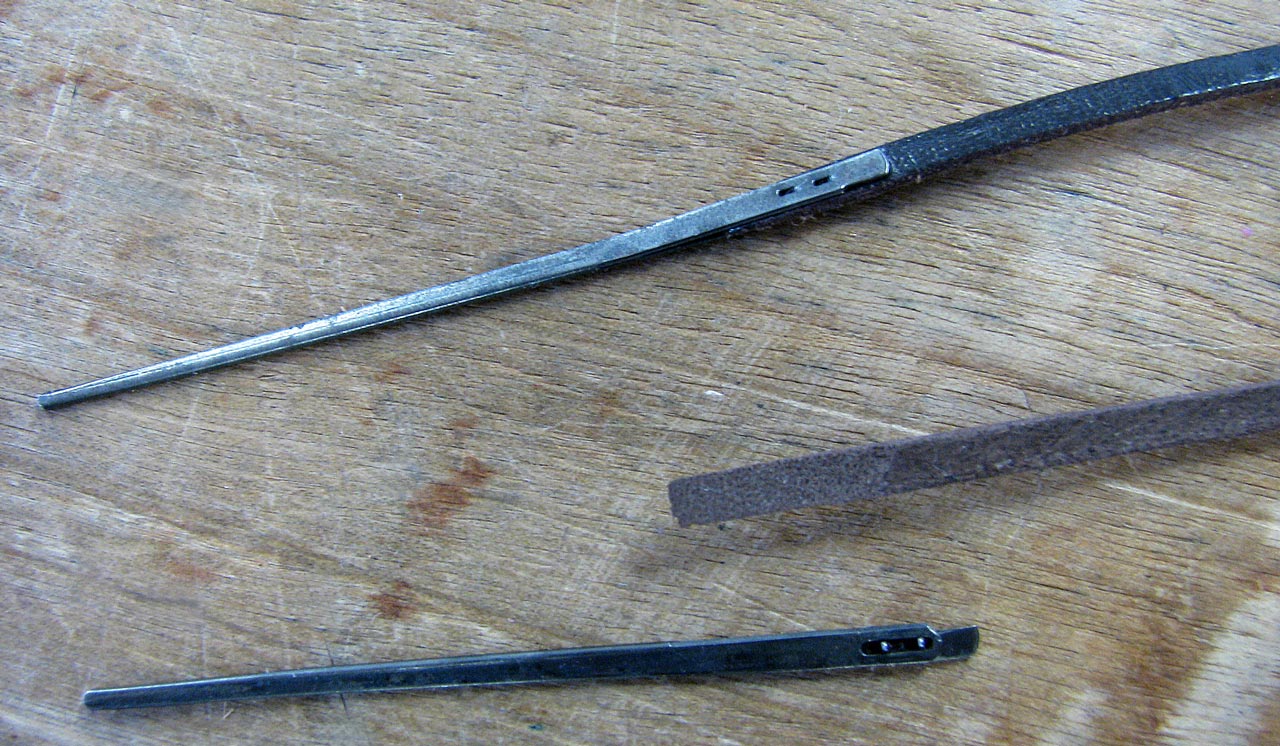
Thin the end of your lace, then puncture it with the two prongs to secure it to the lacing needle.
To Review
The very basics, leatherworking tools you absolutely need: A utility knife, a cutting pad, a firm work surface, a few hole punches, and a hammer or mallet. If you will be hand sewing: harness needles and a diagonal awl blade for punching stitch holes.
Level two - more leather hand tools which I use all the time and which you will likely need: setting tools, stamping or etching tools, a beveller, and a skiver. For sewing: a cork block
Level three - more leather tools I use nearly every day, which may or may not be useful to you depending on your goals: a strap cutter, leather shears, a groover, an oblong hole punch.
Leather Tool Demo Video
Watch this short video to see some leather craft tools being used. Some hand tools demonstrated are a round knife, beveler, hole punch, setter, stamp, groover, stitch spacer, and awl.

