
Leather Project Gift Ideas - Key Tags & Bookmarks
When gifting season rolls around, whether it is a birthday or a holiday like Christmas, we may struggle to find the perfect gift. You could spend hours on end searching your local mall for something that reminds you of them, only to come home empty-handed at the end of the day. Instead of going out to spend another day looking for the perfect gift, why not make that gift instead? Looking for easy affordable leather project gift ideas - key tags & bookmarks are an excellent choice.
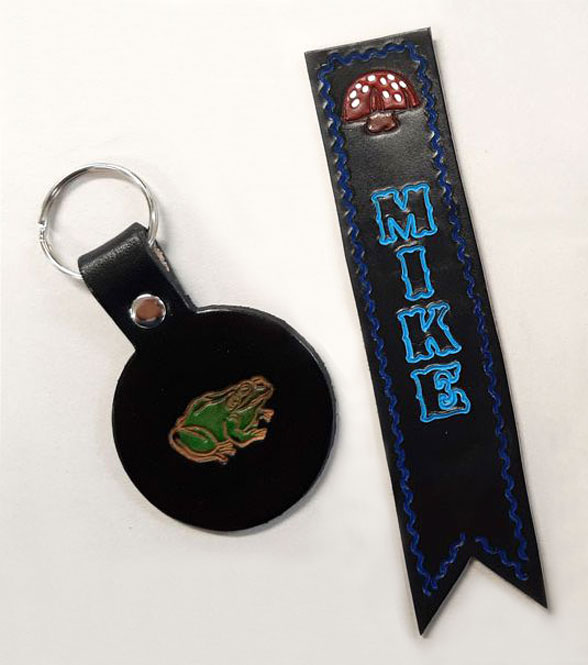
DIY leather key fob and bookmark with imprinted name and nature embossing.
Something simple like a bookmark or key chain could be customized just for them, with the possibilities and variations being endless. In this blog post I will take you through my journey doing just that, making simple gifts that feel appreciated more than the ones that could have been bought instead. I will also mention the methods and different tools one could use to accomplish these tasks.
Tooled design leather bookmark and key fob hand painted.
Starting out, I had to choose the type of leather that I wanted to work on. All the leather project pieces were cut from vegetable tanned leather as to allow for optimal customizability. Vegetable tanned leather is great for stamping and dying, and is very versatile, coming in a variety of thicknesses. Vegetable tanned leather is often called veg-tan leather.
I had cut out a variety of straps, bookmark shapes, and circular key tags. In our leather shop we have a clicker press machine and a variety of custom-made dies, but not every artisan has access to tools like these. Creating a pattern using card stock or repurposed cardboard is relatively easy, and all you need is a pen, pencil, or marker, a ruler or other shape you want to trace (for example, with a circular key tag you could use a small cup), and some scissors. You can then trace the pattern onto your leather and use a utility knife, shears, or other leather cutting tools and punching tools to create the shape you’re looking for. You can even free hand it if that is something you feel comfortable doing. Our shop also sells a variety of leather kits, which include rectangular key fobs, round leather keychain, small key tags, belt blanks (1”, 1 ¼ ”, and 1 ½”), bookmarks, woggles, and coasters.
I had a rough idea of what I wanted to do, and luckily having access to a variety of stamps, I was able to be creative with my leather gifts. Do not let the end products fool you, I had to practice on scraps first to make sure that I would be able to line up the patterns nicely on the bookmarks, as well figure out what patterns I could create and then use. After feeling somewhat confident in what I had tested, I dampened the top of the leather with water and began stamping on what would become my finished products.
When stamping into leather, you want to have a solid, clean, smooth surface underneath your leather. In this shop we use a 12” x 12” stone slab. You want to also use a mallet that’s weight distribution is on par with the depth you want your stamps to be. The heavier the mallet, the easier it is to emboss larger leather stamps into thick leather. The bookmarks, being made with thinner leather (3 oz leather thickness as opposed to the 7 oz leather thickness used for the key tags), required me to use a lighter weight smaller mallet for the job, as well as a smaller stamp handle for the 3D stamps and alphabet stamps. A heavy mallet would push the design too deep into the thinner leather.
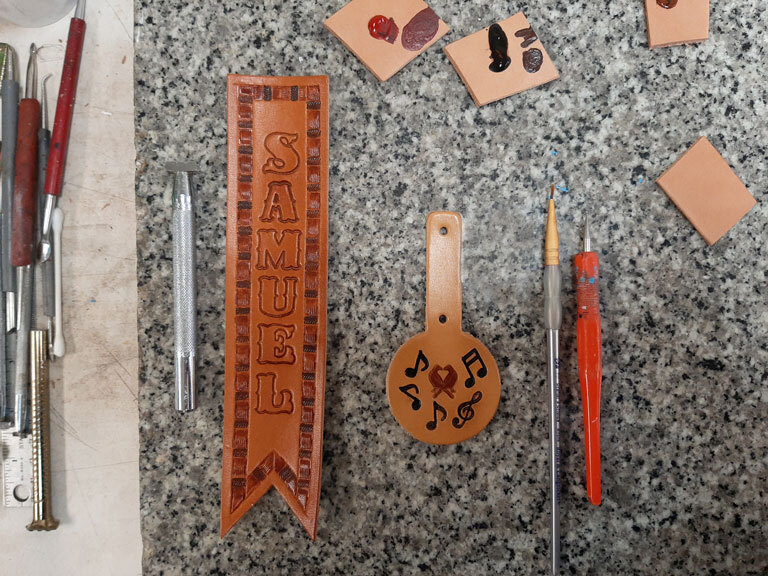
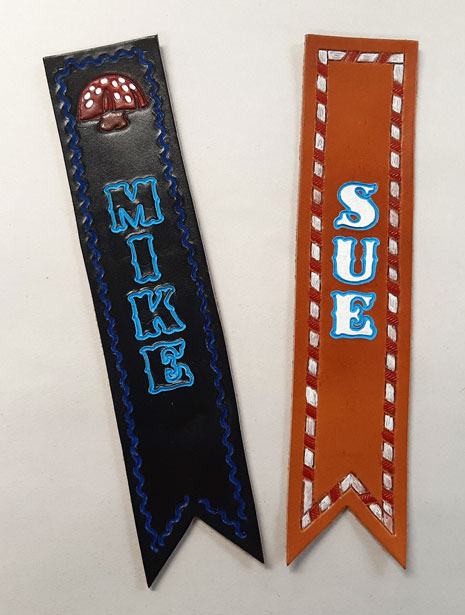
For the imprinted name bookmarks, I had used the ¾” letters. I lined up the letters to be centered and stamped them by tapping the handle with a mallet. Then I figured out where the border design would go. To do this, I used a wing divider to create a light, straight outline for the edge of my pattern. You can see this on the two outside bookmarks in the photo below. This gave me a guide to focus on, making the task of keeping everything straight and even much easier. There were a lot of leather stamps to choose from, as any stamp for the most part can be utilized to create some sort of patterned outline. There were a lot of really cool stamps I liked but I did not use them because I felt they did not suit the people I was making the gifts for. They remain as references for others who might suit them better.
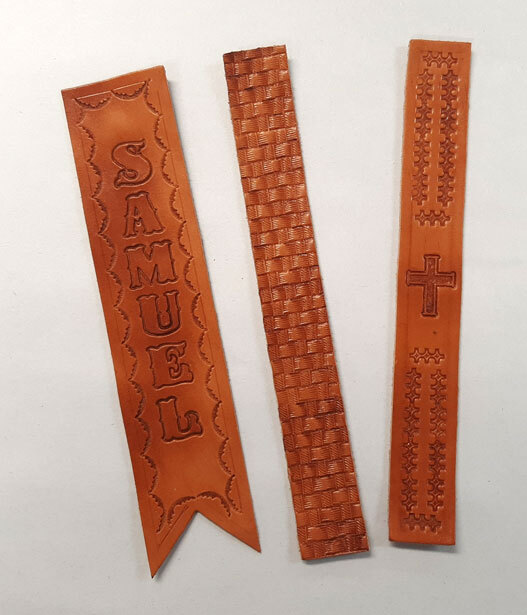
Leather project gift ideas - bookmarks embossed with unique designs.
On the rectangular bookmarks I had a different approach. On one of them, I used a pattern stamp that looked like a basket weave, covering the entire leather bookmark. For the other bookmark, I created a little cross pattern using some of the stamps we had in the shop. For the key tags and on one of the bookmarks, I used some of the larger 3D stamps we had in the shop. On the key tags I used a hefty handle and a larger, heavier mallet, while the smaller mushroom stamp on the bookmark required a lighter handle and mallet.
Once the designs were stamped, it was time to dry and dye these items. In regards to dying the mono-colored key tags and bookmarks, I applied Fiebing's Pro Dye with a wooden block covered in flannel. To get a nice clean finish on these, I used cotton Q-Tip swabs to get in close to the design. The frog key chain however, required a bit of a different approach. I dyed the outside black and left the frog colorless to dry. Once dried, I went in with a cotton swab to dye the frog with Fiebing's LeatherColors.
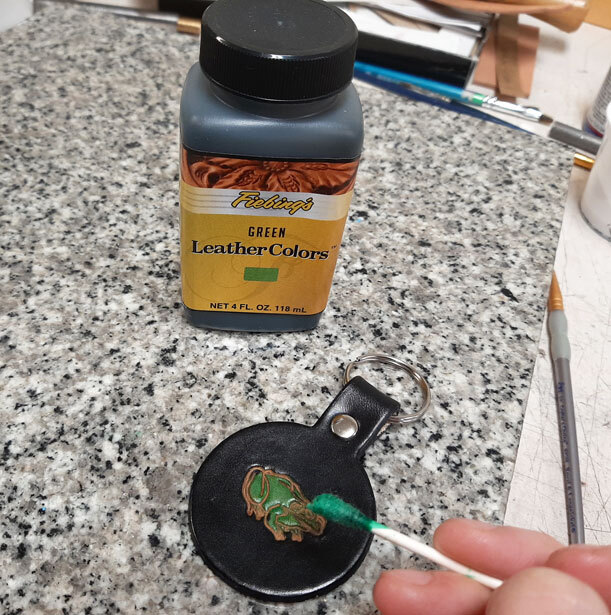
Q-Tip used to apply Fiebing's LeatherColors to dye key tags.
Once everything that needed some color was dyed, I applied a generous amount of neatsfoot oil to the upside of these items. This gives some much-needed moisture to the leather, as it is a conditioning treatment. This is why the natural, undyed leather looks so nice and slightly darker after the oil is applied. After letting everything sit overnight, I edge dyed the key tags, then smoothed the edge by burnishing it with beeswax on a denim cloth, and then polished the leather. The polish we use in our leather shop is Fiebing's Resolene of which I used two applications. After everything was nice and dry, it was time for the finishing touches.
The paint we have in the shop is the Angelus Acrylic Leather Paint, which comes in a variety of colors, and just like any paint, you can mix them to create your own unique colors. This is how I achieved the light blue tones I used on these two bookmarks. For these name bookmarks, I used a stylus tool to paint the inside of the stamped leather. The stylus is best at keeping the paint inside the embossed crevasses of the stamped letters and was also preferred for painting Mike’s border pattern for this reason. On Sue’s bookmark, I opted to use a small paint brush to paint the border pattern as well as the inside of the letters.
Bookmarks are great personalized leather gift ideas for family and friends.
Now it was time to let the paint dry and then set the rivets in the key tags! You can read our blog post on "How To Rivet Leather". I chose the color of the key rings and single cap rivets based on what I thought matched the colors I used on the key tags.

Key tag leather project gift ideas completed for someone special.
The day I would have spent shopping for everyone was instead better spent making these gifts. These little handmade keepsakes that can be used every day are much more personable. Everything said and done, I think I would have spent more time and money if I had spent my day at the mall instead of in the shop making these gifts.
I hope this leather project gift idea post was informative and inspired your inner artisan to make something fun and unique for your next gifting event.


